

how to clean cat ears olive oil
PetSide may earn a small commission from affiliate links in this article. Learn more
Cats can clean themselves well enough that they don't need our assistance. However, they will always have certain body parts that require a more "human" touch. Their ears, for example, will need our assistance in cleaning them. The most they can do is to scratch their ears in the hope of dislodging or removing whatever is inside. Earwax, dirt, and other particles may be present in the cat's ears that no amount of scratching can ever remove. This is where you come in. You can help your cat by cleaning its ears the correct way. Here's how:
Gather Your Supplies
Before you start cleaning your feline friend's ears, it is important to get everything ready. To clean your cat's ears you will need to get a hold of the best cat ear cleaners you can get. You can buy the best ear cleaning solution for your cat from the pet store. Make sure that its formulation is specific for cats. Choose a cat ear cleaner that contains natural ingredients as these will not cause any unnecessary side effects in your cat.
If you don't like the cat ear cleaners from the pet store, you can use olive oil instead. This can help clean your cat's ears while also helping lubricate the ear canal. If you are not keen on using olive oil on your cat, then you can make a simple vinegar solution. Add 1 part of vinegar to 2 parts of water. This is your basic solution for cleaning the excess wax and dirt in your cat's ears.
You will also need a medicine dropper if you are going to use your homemade ear cleaning solution. If you're going to use a store-bought cat ear cleaner, then the dropper is not necessary. The cleaner already comes with its own dropper.
Cleaning your cat's ears will also require several pieces of cotton balls and a container with warm water. It is often a good idea to keep your cat's favorite treats handy if you want it to remain calm.
Get Your Cat Ready
Not all cats like having someone mess with their ears; they can scratch you or bite you. To allow for a safer cat ear cleaning process, you may want to consider a cat restraint system. This is true if you have a kitty that is feisty during grooming.
Wrapping your cat with a soft towel can help. The towel covers your pet's body and paws so you'll get full access to its head. You can also use a restraint bag. It's a nylon or canvas bag that you can put your cat in, leaving only its head outside. If you don't like these methods, then you'll need the assistance of someone else to hold and secure your cat so you can clean its ears.
Place your cat on a counter or table. Make sure that it is calm before you start tinkering with its ears. Some pet parents find playing with their kitty 15 minutes before ear cleaning can help make the cat calmer. You can also try it with your cat.
Related Post: Cat Calming Sprays
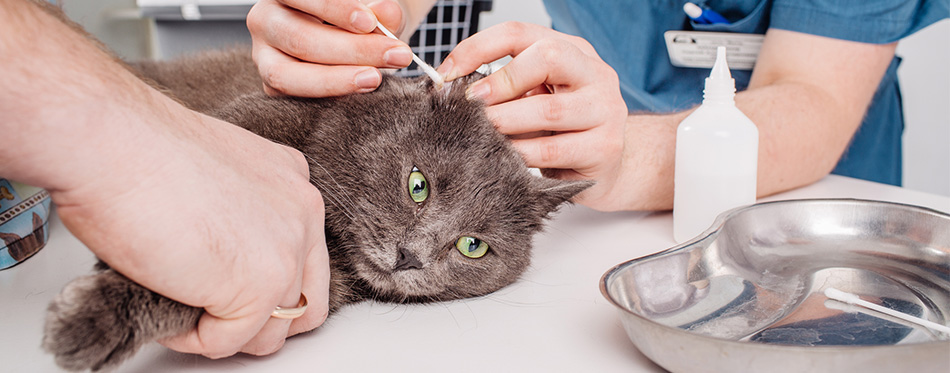
Inspect Before You Clean
As your cat is lying on the countertop or table, now is the perfect opportunity to inspect its ears. Check if you can see any sign of discharge from its ears. If there are, take note of the consistency and odor. A foul-smelling ear discharge is almost always an indication of an ear infection. In such cases, your ordinary ear cleaning solution may not help. You can still clean the ears, though, but make sure you are going to bring your cat to the vet later on.
Also check the ear canal for signs of redness or swelling. These are signs of inflammation, but not always an indication of infection. It can mean that something is irritating your cat's ears.
Inspect the outer ear of your cat. Feel the ear for lumps or masses. Take note of the location of these masses if ever you find one. You can always ask your vet later on.
Get Ready to Clean
Once you're done inspecting your cat's ears and taking note of possible problems, it's time to clean. You will first need to warm up the ear cleaner, olive oil, or vinegar solution. You can place the bottle into the container with warm water to bring the ear cleaner's temperature closer to body temperature. Don't use a cold ear cleaner as this can startle your cat.
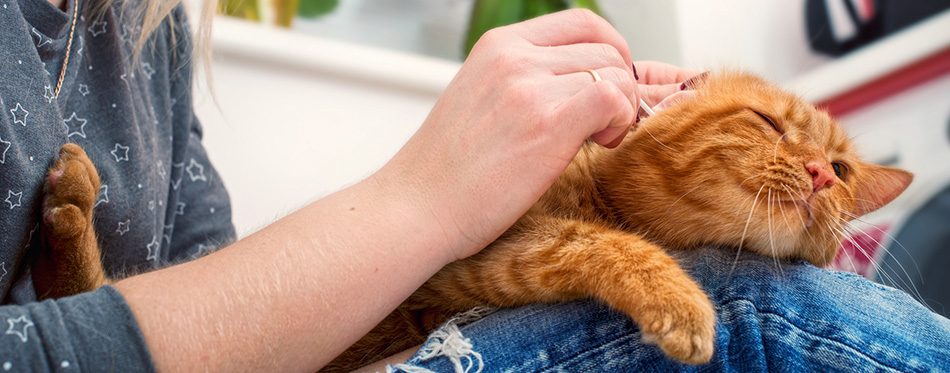
Lay your cat in a side-lying position to help facilitate the introduction of the cleaner into its ear. Hold one of your cat's ears and pull it upward and to the back of its head. You would want to have a good look of its ear canal.
Put one or two drops of the now-warm ear cleaning solution into the ear canal. Apply rubbing motion on the base of the cat's ear to help distribute the cleaning solution throughout the ear. Keep massaging your cat's ears for about 30 to 60 seconds. The massaging action also helps loosen up stubborn debris and ear wax.
Now do the same with the other ear. Or, if you want to be more efficient, you can place a drop or two of the cleaning solution in both ears. This way, you can perform a double massage of your cat's ears.
After massaging your cat's ears, leave it for about 5 minutes. This is should be enough time to let your cat shake its head like crazy. This is its attempt of removing the solution you put inside its ears. Shaking its head will dislodge earwax and dirt from their attachment and move these towards the outer ear canal.
After 5 minutes, you can then wipe your cat's ear canal with cotton balls. This will help remove the oil and dirt from its ears.
Don't forget to praise your cat and to give it a treat for being such a good cat.
Cleaning your cat's ears is easy if you follow our recommendations. If you want a more professional cleaning, then a cat groomer is your best choice.
Source:
- How to Clean a Cat's Ears – PetMD
how to clean cat ears olive oil
Source: https://www.petside.com/clean-cat-ears/
Posted by: herreracized1947.blogspot.com
0 Response to "how to clean cat ears olive oil"
Post a Comment