

Living Mushroom Sculpture : 6 Steps - herreracized1947
Introduction: Living Mushroom Carving
Mushroom are traditionally farmed along hardwood logs by inoculating them with mycelium.
These logs are commonly stacked like in the image below. After few months, the mycelium colonizes the log and mushrooms start to bloom out of it.


I was inspired aside this process and yearned-for to make a sculptural gift prohibited of it.
I wanted my sculpture to be capable to hang in Beaver State outside and have minimal maintenance requirements.
In this Instructable you will learn the following things:
- How to inoculate and prepare logs for growing mushrooms
- Mannequin quasicrystals in processing
- Produce toolpaths in MeshCAM to machine these patterns
Supplies

For this project you will need to set forth with the following materials:
- Mycelium plugs of your tasty, I used these.
- Just about beeswax, or any past natural wax.
- Flaxseed oil to sealskin and protect the woods from the elements.
- I misused a 1/8 in 2 flute endmill to do the machinig.
- Any not aromatic hardwood, I chose birch.
- Some high quality plywood.

Choose a plyboard that has alternating colors, this way after the machining the grain patterns will be extra fun!
Stride 1: Designing Quasicrystal Patterns for the Back Denture
For the backplate design I chose to use QuasiCrstal patterns.
Hera is a Gif successful by Keegan

I feel these forms improbably fascinating!
If you'atomic number 75 fascinated in reading more about how to have these forms using code I advise meter reading his blog.
Processing was used to make this code, I have slightly altered Rotormind's encrypt to better suit my need.
He has a great Instructable happening 3D printing quasicrystals if you're involved!
I have highlighted in red the part of the cipher to change to get different patterns.

I chose the values: 4,7,3

I have attached some other variations.
Step 2: Converting the Pattern to 3D and Creating the Toolpaths
Now we need to convert the print practice to 3D and then generate the toolpaths for machining.
I used MeshCam,( they have a 15 Day fully functioning trial if you want to examine IT out) to convert the image to 3D.
Open the chosen image, and make a point to select the reactionist dimensions.

For the plywood I had, 0.15 Inches as the z profundity worked well to make for out the stripy patterns in the wood.
Clink Ok and meshCam automatically converts the image to 3D.
Next we need to make the toolpaths, for this I used the defaults setting for everything except the feeds and speed highlighted in the figure:
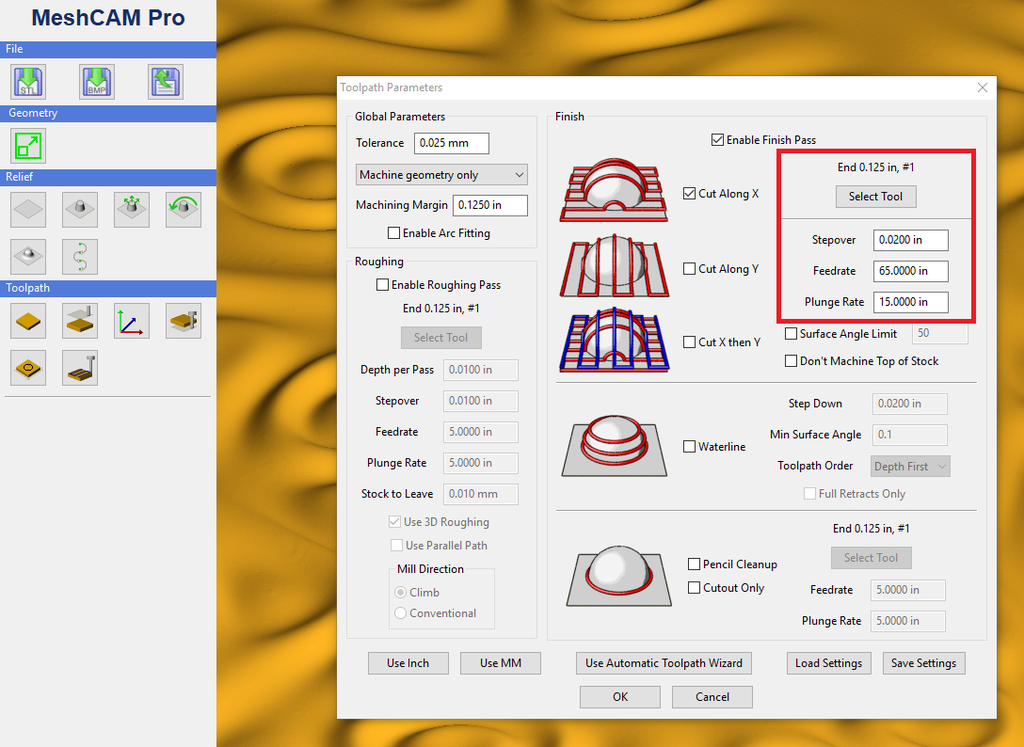
I old a 1/8 Inch 2 fluted endmill. Take the straight tool depending on what you have.
Note of hand that I did not make out a roughing drop dead as this is a very shallow form and so I directly did the finishing fleet.
Click Ok and meshCAM will generate the toolpath.
Next click Save Toolpath and make sure to set the Save type as Basic Gcode-Inch if you are victimization an Xcarve to do the machining as highlighted in the images below.


Immediately we have our toolpath, undisguised information technology in Easel so that we can send the Gcode to the Xcarve CNC machine.
Under the Spell tab clack on the Gcode import button:

Examine the feigning to make a point everything looks good before clicking on chip and sending the code the the machine!

And we'Ra finally prompt to machine the approach pattern!
Step 3: CNC Cutting the Patterns
Make a fewer mental testing cuts first to ensure you the likes of the outcome, also try retired different stains and oils to see what information technology will front similar when completed before committing to do the full edit out.

After this secure your material firmly to the Make love and make the Swing!


Make sure to pause the carving and to vacancy out all the saw sprinkle all at times.

Measure 4: Inoculating the Logs
While waiting for the CNC to complete the gashed, in this step we are going to prepare our logs and immunise them with mycelium.
Make freshly cut logs, they must be clean and non already ingest rot or other fungi growing connected them as this will inhibit our mycelium from organism able to colonize the backlog.
Any eccentric of non aromatic hardwood will do only Oak tree wood is preferred, I chose Birch because that was what I had available to me.
Split the logs to size as per your design and then bore holes in them at about 1 edge in spacing.
 \\
\\
After this enter the mycelium plugs in the holes, if they are bonded together suchlike in the image down the stairs you can separate them without harming the mycelium easily.

 \
\
Pounding them into the holes lightly until they are flush with the bark.

Now we need to sealskin this log in Beeswax to protect the log from other organisms and to living the logs moist.
Utilize a double bath to melt the beeswax.

Use a brush and coat the mount on the logs, make a point you cover IT completely to in full protect it.

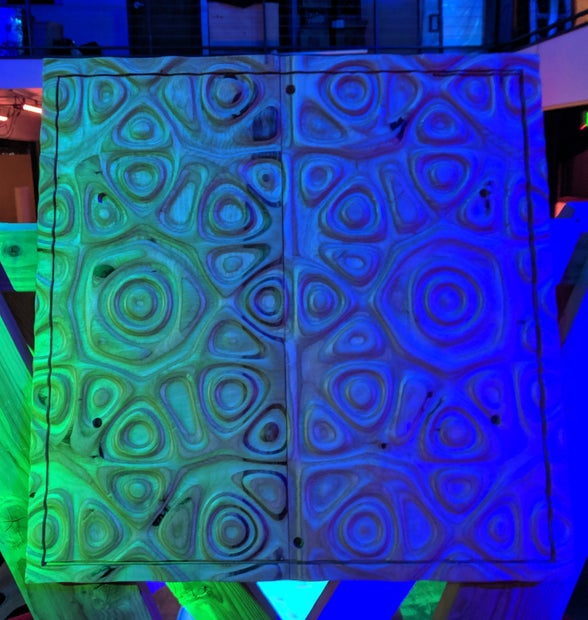
Step 5: Sanding and Finishing.
Now that the X-chip has realised sculpture our pattern we deman to Sand gone the burrs and toolmarks:

I used 120 Grit sand paper for this, it was effective at quickly sanding retired all the burrs.
I quite liked the tool marks and indeed i decided to leave those be.

A process colorful of the left side sanded.

After sanding we now need to apply some linseed oil to protect the plywood for outdoor use.
To do this I old a foam brush and applied 2 coats and let information technology absorb into the wood overnight.

The oil also helped take out the grain to overstate the stripy patterns in the plyboard.
Step 6: Final Assembly and Notes.

Now that everything is ready, downright the final assemblage.
Your mushroom sculpture is now complete! You can either install the sculpture indoors or alfresco in a lightly shaded orbit.
In 3 months the mycelium leave colonise the logs. At this point mushrooms will start to spud!
If after 4 months your mushrooms have not yet sprouted, you can piddle the logs with cold water, which will whoremonger them into thinking it is winter. They wish sprout soon subsequently.
You can harvest and eat these mushrooms.
You can echo this summons every 3 months about 3 times with the initial logs.
Enjoy your mushrooms!


Be the First to Share
Recommendations
Source: https://www.instructables.com/Mushroom-Sculpture/
Posted by: herreracized1947.blogspot.com
0 Response to "Living Mushroom Sculpture : 6 Steps - herreracized1947"
Post a Comment